Saturday 29 July 2017

Dream Big - Clearly Besotted Stamps and Polychromos Pencils - VIDEO

Hello again Everyone. I'm enjoying making videos at the moment, so I have another card from the last Clearly Besotted release (not long now until the new one!) that I've coloured with Polychromos Pencils. I got these for Christmas 18 months ago and I need to get them out of their case more often!


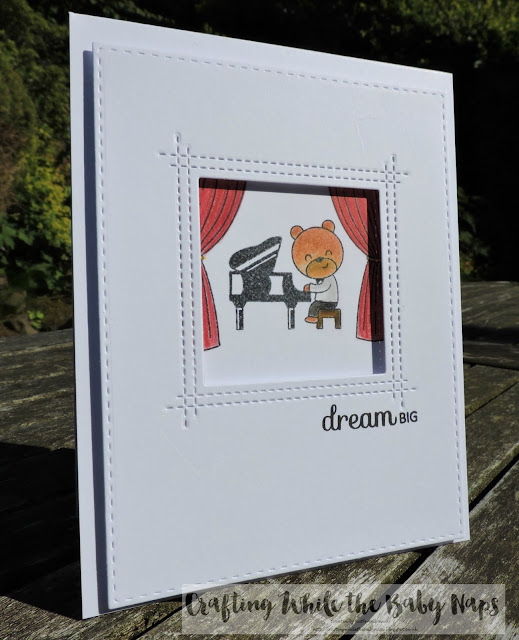
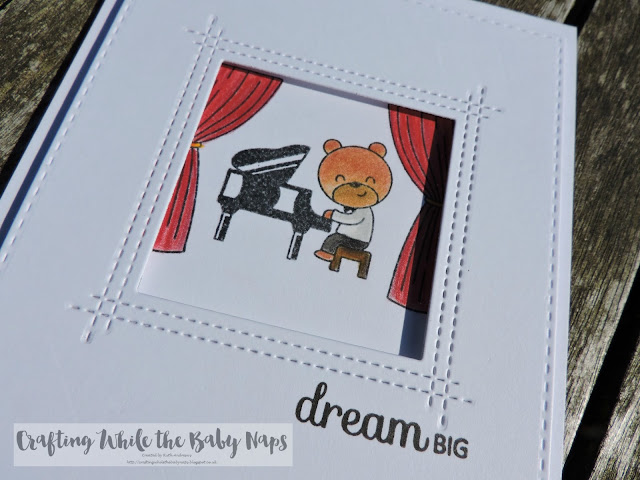
I started by cutting a piece of white card to A2 (US) size and then die cutting it with a stitched rectangle and then with the MFT stitched Peekaboo frame die.

With an A2 white card base and my Precision Press, I stamped the pianist and the curtains in Memento Tuxedo Black. Even though I'm not Copic colouring, it's a nice black ink that dries quickly.


I then proceeded to colour with my pencils, and you can watch it all in the video below or over on my YouTube channel.


I stamped the sentiment on the front with VersaFine Onyx Black ink and then popped it on the card base with foam tape - as you can tell from the video, that didn't quite go to plan, but I'm still pleased with how it all turned out.


Thank you so much for taking the time to visit me today, and I hope to see you all again soon!

Sunday 23 July 2017

Ink Dusters Vs Ink Blenders - VIDEO

So I was playing around with the MFT cloud stencil making backgrounds for some cards (Mr Seagull was one of them) and did a bit of filming of me using both the Ink Dusters and Ink Blending tool that I normally use.


The Ink Dusters are manufactured by a local company called Inkylicious. You get a pack of 3 brushes for £14.99, although I think my craft fair purchase was a little cheaper, and they are double ended so you get 6 brushes. You can read all about the brushes on the Inkylicious web page.

You can watch my video below or in YouTube:


Some pictures of the end result. In the video you see me using just distress ink, but I also used some Altenew inks which I like to blend with too - I find they don't stamp well but they do blend nicely.

1. Altenew Ink on the left, Distress on the right. Ink Duster at the top, Blending pad at the bottom.


 2. You can see in the following two photos how much brighter the blending tool lays down the ink. This is the blending tool. Altenew Ocean Waves on the left and Tumbled Glass on the right.


3. The Ink Duster does lay down a lovely layer of light ink which you can build on. Altenew on left, distress on the right. 


4. I even tried on vellum and the result is the same. Lighter layer for the ink duster and brighter with the blending tool.


5. The cards I made. Each picture has one background with the blending tool and one with the ink duster. While the photos aren't great, you can tell the difference.


I really do like them and find they lay down a nice light layer of ink that you can build up and it often avoids the harsh lines I can get with the blending tool. I may in future invest in some Clarity Brushes as well as I think the pointed tip will come in handy. I won't give up on the blending tools, as I think it depends on the look you are going for as to which tool you use for your project.

Do you have any of the brushes? Clarity or Ink Dusters? Would love to know your thoughts. I'm a big fan of crafting tools! 

Thank you so much for popping by today. Happy Crafting!


Saturday 22 July 2017

Follow Your Dreams - Schoenberg and Clearly Besotted Stamps

Hello Everyone! How are you all? Can you believe it's almost time for another Clearly Besotted release already? I do appreciate them quarterly now though, as I actually get the chance to play with the ones I bought in the last release before the new one comes along.

I made this card at around 5am one morning when I really could not sleep and my head was swimming with a million and one things, so the best thing to do was to go and craft.


This is a card I've been thinking about since my stamp sets arrived and it finally made it onto paper, or card for that matter. It's inspired by one of my favourite pieces of music, Verklarte Nacht by Schoenberg. I've taken a bit of a liberty as it's a string quartet, so no flute, but they worked so well together I couldn't not have them.

I started by stamping the two figures onto Copic friendly card stock and then masking them off with masking paper before stamping the tree background on top. I love the magic of removing the masking paper!! I then coloured them with Copic markers, using three yellows for the moon shining through the trees. 


I die cut the panel with a stitched rectangle die from Simon Says Stamp and adhered it to a white card blank with foam tape. I stamped the sentiment on the bottom with VersaFine Onyx Black.

Thank you so much for visiting me today, and for all your comments. Happy shopping when the time comes ;)

Thursday 20 July 2017

Seven Hills Crafts Monthly Craft Challenge - July 2017

Hello Everyone. I'm getting in lateish to this month's Seven Hills Crafts Monthly Craft Challenge, which is a sketch. 


I've been playing around with my new MFT goodies that I got at the craft fair back in June - you can watch my haul video for more details.


I've been playing around with my ink dusters and that MFT cloud stencil that seems to be out of stock everywhere. Once I'd inked up my background panel I cut it out with the journalling card part of the WPlus9 Sunshine Layers die which I think is one of my most used purchases ever.


I stamped and Copic coloured the seagull - doesn't he just look so Zen and chilled? - and then fussy cut him out. It was a simple assembly adhering the cloud panel to an A2 (US) sized card and attaching Mr Zen Seagull with some bits of foam tape. I stamped the sentiment on some scrap card and then found a piece of scrap sunshine cardstock from the Whatever the Weather paper pad by Sugar Pea Designs. 


I hope this makes you as happy as a seagull with a chip! Thank you so much for joining me again and I wish you a fabulous weekend when it arrives :)

Saturday 15 July 2017

Flower Challenge #10 - Reminder - Embossing heat/dry

Gosh, where does the time go? Here we are at the half way mark of this month's Flower Challenge which is all about Embossing heat or dry. 


 This time I went with heat embossing:


This was pretty simple, just heat embossing with some Versamark and Bright White Wow! Embossing powder onto some watercolour cardstock. I then spent a very happy hour colouring with my Inktense Pencils. I forgot how much I love them! After a blob incident, I decided to fussy cut it out and just place it onto a dark background onto a white A2 card base.

You can watch the video here, or over on my YouTube channel.


Don't forget, you have until 25th to enter. Happy flowery crafting everyone!

Tuesday 4 July 2017

Flower Challenge #10 - Embossing heat/dry

Hello and welcome back to another challenge here at The Flower Challenge. This month we are focussing on embossing - either heat or dry.


If you watched my last haul video, you'll have heard me mention my friend Lisa who loves stencils and is giving me a healthy interest in them. She once told me that you can emboss with them, and so I decided to give that a try.


It works amazingly well. You may need to play around with whether or not you need an extra shim so that it embosses all over. I find my machine and the rubber mat I use occassionally needs one depending on the stencil. This was a freebie from a recent Simply Cards and Papercraft.

I kept the stencil over the embossed piece and used my new Inkylicious ink dusters to add a light coating of some purple and green Altenew inks over the embossed area. It gives a nice light touch of colour.


I then added some sequins for a little bit of sparkle..... OK, no I made a boo boo with a bit of the card as the stencil had some sticky glue on the back I never noticed and it transferred to the card. Sequins hide a multitude of sins.

I added three layers of my new MFT scalloped frame die to the outside. I couldn't decide on a sentiment at all, and so I just left it blank.


As usual, you have until 25th of the month to link up, and I'll be back on 15th with some more embossing. Happy crafting everyone!

Blog design by aleelilydesigns