Saturday 31 March 2018

Owl you doing? - CAS Colours & Sketches #265

Some of you may have noticed that I've not been posting for my Design Teams on The Flower Challenge and The Card Concept. I made a hard decision to come off both teams last month as I was struggling to manage with it and starting work. Much as I enjoyed both teams, I find it extremely hard to think of cards to make when asked to do so. My hat is off to all my crafty friends who are on Design Teams!

Sometimes, however, I can find the brain power to enter a card that fits a challenge, and in this case it was the CAS Colours & Sketches #265.


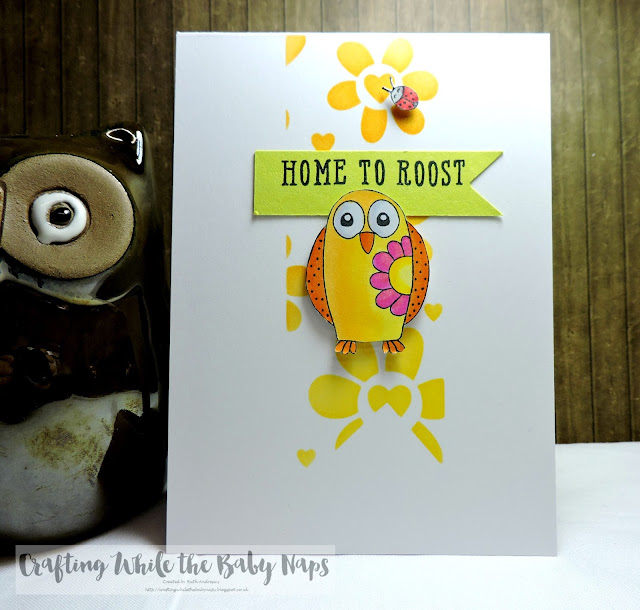
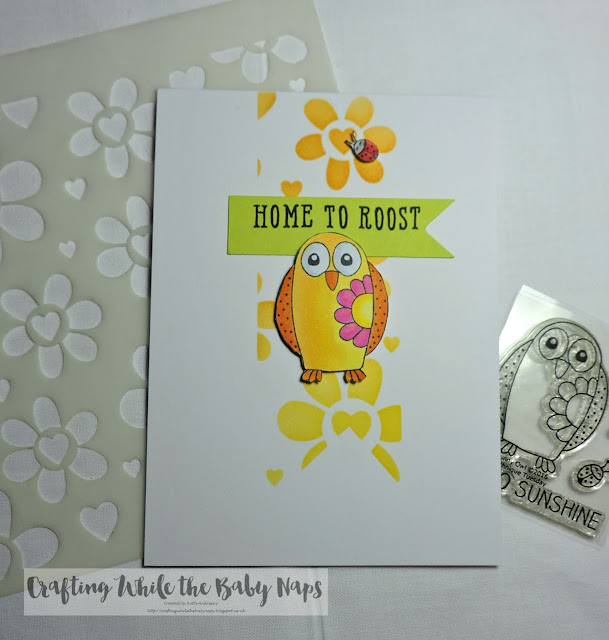
I loved the sketch as it was nice and clear and simple. I was sent this image by a kind crafty friend some time ago and somehow it just fit the bill perfectly. I love owls and this had to be coloured in the brightest colours I could find - yellows, orange and pink. 

As I don't have a flag die, I masked one over this Uniko stencil that I got in a recent haul and blended over some yellow and orange distress inks.

I fussy cut the owl and the cute little ladybird and made the sentiment flag myself with an Avery Elle small alphabet set.


It really did come together nice and quickly and simply and it will be going out in the post soon - I have so much happy mail to send it's not true!

Thank you for taking the time to visit me today. It really is very much appreciated. Happy Crafting!

Sunday 25 March 2018

Mermaid Week - Day 7 - Honey Bee Stamps - VIDEO

Well, here it is, the last day of Mermaid Week! I hope you've enjoyed all my creations so far. Now this one is special to me because I was given the stamped image on a panel at the very first Colouring Challenge Road Trip in Edinburgh last August. I intend to buy this set as soon as I can - Honey Bee are now being stocked in Dies to Die For - and so I hope you'll forgive me not actually owning it quite yet.


It's a fabulously cheery mermaid and I knew exactly what I wanted to do with her. I wanted to give her the coloured pencil treatment and to use my black pencil for highlights and add a stencil around her just like Kathy does.

I have a speed colouring video you can watch here or over on my YT channel:


I used my Polychromos and made sure I sharpened them often. I'm still not too happy with skin tones - I struggle with this with my Copics as well - but I enjoyed the challenge and the practice.

  
Thank you for sticking with me. I have so enjoyed using up my stash in as many different ways as possible and I enjoyed that they all turned out completely different. The only thing in common was that they were mermaids. Adieu Mermaids for a little while at least...

Happy Crafting Everyone!

Saturday 24 March 2018

Mermaid Week - Day 6 - Kinda Cute by Patricia

I do like digi stamps for their price and the fact they are very easy to store. The only thing I find is that as I don't see them - ie they are in a folder on my computer - I don't always automatically think of them.

However, I have been following Patricia's drawing and colouring on IG and when I saw the mermaid digi stamps, I knew I had to have one. 


I printed her out on Make It Colour Blending paper and coloured her in with my Copic markers. I then fussy cut her out - yes the hair was a bit of a challenge! I used my distress inks and my wave stencil from Create A Smile to create the background. I deliberately moved the stencil when using different inks to add more waves.

I then die cut the panel out with my WPlus9 Sending Sunshine die and adhered it to a white card blank. The sentiment is from the Clearly Besotted mermaid set you saw in my Wednesday post.


I will be back tomorrow with my final card and a video as well. If you do feel inspired, please tag me on IG and use the hashtag #ruthsmermaidweek.
 
Happy Mermaid Crafting!

Friday 23 March 2018

Mermaid Week - Day 5 - Mama Elephant

I was lucky enough to win this stamp set from one of my favourite shops Dies to Die For in their big Christmas giveaway. I had it on my craft desk and when my eldest came in one rather miserable Sunday afternoon she spotted it and we all trooped downstairs to colour them in.


I stamped them on to Strathmore Coloured Pencil paper - for me! - and some white cardstock for the girls. I found some old Caran D'Ache junior pencils that my sister gave me and we sharpened them up and used those.

With my colouring on the thin paper, I decided I would make a shaped card with it and cut it out with my old faithful Spellbinders Standard Circle Large dies. I then got a card blank and cut it out with the same circle die, being careful to have it over the edge of the fold so it wouldn't cut there.I just attached the coloured panel on the front with some ATG tape.


Thank you so much for your encouraging comments on my posts this week and over on IG. If you do fancy playing along, don't forget to tag me and use #ruthsmermaidweek.

Happy Mermaid Crafting!!!

Thursday 22 March 2018

Mermaid Week - Day 4 - Lawn Fawn

This was the first mermaid set I bought and I've had it for very nearly two years now. I found two videos of me using it a couple of years ago with Inktense Pencils and using it with Felt. It's definitely had good use!

I wanted to make a spinner card as I think the little mermaid and the merman look as if they should be holding hands and swimming towards each other doing so.

Anyway, here's my card:


I used my Hahnemuhle paper again and blended distress inks over it in three shades of blue - no of course I didn't write it down! - I flicked on some warer and dabbed it off. This paper is brilliant for taking off the distress ink and leaving a fantastic splatter. I then added splatters with my Spectrum Sparkle pens.

I coloured the mermaid, merman and narwhal with my Caran D'Ache watercolour pencils and metallic water soluble pencils. The sea creatures are from my Clearly Besotted set and I used my Gansai Tambi on those. They were originally meant to go in yesterday's card, but didn't seem right for the occasion.

I put my spinner card together. If you want to know how to do this, I have a spinner tutorial on my YouTube channel.


The spin was a little sticky but once the whole card was dry, they flew around quite happily.


I've had so much fun with these mermaid cards and I'm so glad I've managed to use quite a lot of different media on them too. Please keep sharing on Instagram with #ruthsmermaidweek and don't forget to tag me @craftingwhilethebabynaps.


Keep on crafting!

Wednesday 21 March 2018

Mermaid Week - Day 3 - Clearly Besotted

You know how much a fan I am of Clearly Besotted and have been since I started stamping and colouring over three years ago. Pretty much most of my stamp collection is Clearly Besotted. I love that they are a UK company too! Easy to get and easy to ship and usually arrives 1-2 days after ordering.

One of their recent releases was this mermaid stamp, and this was the trigger for me thinking about having Mermaid Week.

For these cards I've used my Gansai Tambi and Gansai Tambi Pearl Colours. I used some Hahnemuhle watercolour cardstock for this. It is very thick and I tried wet on wet watercolouring but found that the water soaked into the paper too quickly and I just didn't manage to get it feeling right for me. It works really well for blending with distress inks though, so I shall use it for that.


I went for a loose messy look with the mermaid sitting contemplating. I do love my Pearl Colours. They have just brought out some gloriously bright Gem Colours which of course I have to have!

I just simply die cut it with my Lawn Fawn large stitched squares and mounted it onto a 5x5 inch square card.

Keep sharing your stuff over on Instagram with #ruthsmermaidweek and most importantly have some crafty fun with your stash! It's just for a little bit of fun!

Tuesday 20 March 2018

Mermaid Week Day 2 - Stampin' Up

Every month on a Tuesday night I head off to my Stampin' Up class. I've been going since November and am enjoying it, so I decided I would treat myself to something from the new release, including this Magical Day set which had a small mermaid in it, so of course I had to buy it!


I stamped her out several times onto some Winsor & Newton watercolour cardstock that I've had for a while and not used yet. As I wanted to use this sentiment, I decided to just colour in one, so she is really one of a kind. I coloured her in with my Spectrum Sparkle pens, which are very vibrant and very sparkly. You can't see it much on here.


I cut some of the glitter cardstock I also got in my haul and added a strip down the left hand side, trimmed off my mermaid panel and attached it on top with some fun foam. I mounted the sentiment onto another piece of glitter card to frame it and also attached it with some fun foam. 

I hope you're enjoying mermaid week. I feel so good at using up some of my stash! Don't forget to use #ruthsmermaidweek if you want to join in on Instagram, so I can find you. You can tag me too, I'm @craftingwhilethebabynaps. It's just for a little bit of fun :)

Happy Crafting!!


Monday 19 March 2018

Welcome to Mermaid Week!

Curious to know what Mermaid Week is? Read on! I discovered after my January craft haul that I owned seven, yep, 7, mermaid stamps. I'm hazy on how it happened as I don't like to duplicate stamps if I can, but clearly mermaids call to me. With seven stamps I thought it would be fun to challenge myself to make a different card for every day of the week, hence the creation of Mermaid Week.

So without further ado, here is my card for the very first day.


It's a new to me stamp company called Nina Crafts who I discovered through a friend when we met at a craft fair last October. Have a look at their website as they have a few different brands and they also manufacture stamps, in case any of you fancies a foray into setting up a new company!

She is a really good size and her hair and flowing tail were just perfect for practicing my Copic colouring on. Hair is something I really need to work on still. I decided to go all out on my colours - ooops.... didn't write them all down, yet again - and she had to have pink hair and a bright green tail.

I did some ink smooshing with distress inks on a piece of watercolour card and then fussy cut out my mermaid - I do love it, if you watched my paper piecing video, you know I do. I simply popped her and the bubbles up on foam pads.


How do you feel about mermaids? Fan or not? Feel free to join me in mermaid week, and if you're using Instagram, use the hashtag #ruthsmermaidweek It's just for a bit of silly fun and to share my love of mermaids!

Sunday 11 March 2018

How to... Paper Piecing for Card Making - VIDEO

A very talented and lovely crafty friend gave me this Stamping Tiny Townie Garden Girl Morning Glory stamp for my birthday back in November and I've been thinking about doing the paper piecing technique with it ever since. I LOVE paper piecing and I LOVE these Garden Girls and I decided to film the process for you.


The great thing about paper piecing is that you can use up lots of scraps. I found some of my Lawn Fawn plaid paper in my scrap pieces box and, as you'll see in the video, I had two pieces of just the right colours of blue and green.

You can watch the video here, or over on my You Tube channel:


The thing to remember when fussy cutting is to move the paper and not the scissors. I coloured the rest of the girl in with Copics and simply die cut with my WPlus9 Sunshine Layers die - that's one of the best purchases I've ever made! - and adhered to an A2 (US) card blank that I'd covered with another piece of my Lawn Fawn plaid paper.


Thank you for taking the time to read and leave me a comment. Wishing you all a very Happy Mothering Sunday and lots of crafty fun!

Thursday 1 March 2018

Craft Haul - February 2018 - VIDEO

Hi Everyone! Thank you for your well wishes. I still have a cold, as you'll be able to tell from this video, but it is improving every day and I certainly don't feel as ill as I once did.

I'm over on my YouTube channel sharing my crafty haul for last month. Managed to spend a bit this month - ooops! But got some nice things and am desperate to get stuck in and crafting a bit more. And if you stick with the video to 7 minutes or so, I hope you'll forgive my generous mistake!


You can watch it below, or over on my YouTube channel.

Once again, thank you for stopping by and Happy Crafting!

Blog design by aleelilydesigns